


Unless you’re someone who likes winter sports, winter blows. It’s cold, damp, and gets dark before dinnertime. Here are some of our van life winterization tips for getting through the colder months in your van or RV.

Winter can be dreadful enough living in a regular sticks and bricks home, but when you live in a metal box outside, it poses a whole new set of challenges. In an attempt to make our van more comfortable for the season, we’ve done a few things to bring Clementine into winter mode. Have a look at our winter van life tips below and start getting cozy!
1. INSULATE. EVERYTHING.

Whether you built out your van yourself or bought an already converted van or RV, hopefully all of the walls, ceiling, floors, and doors have a layer of insulation behind them. Our van was already converted in the 80s so it has classic fiberglass insulation in the walls and doors but unfortunately lacks anything beneath the floor. If we were to have added this during our renovation process, we would have had to gut the whole thing. In the interest of time, we opted not to BUT wish we had done it in retrospect.

In any case, the biggest heat loss point is usually the windows. We made custom-fitted panels with Reflectix and scrap fabric to help offset this. Something super key about Reflectix that a lot of people overlook is that it needs a bit of airflow in order to function properly. That means that it’s beneficial to have small gaps around where the Reflectix meets your windows instead of trying to make them airtight — that’s how Reflectix works.
Another thing to consider is that the shiny silver bubble wrap showing in your windows from inside and out looks pretty ugly. It’s a win-win to cover these in fabric because it adds an additional layer of thickness, creates another layer of air space, and looks much neater. Don’t be scared off if you don’t know how to sew, you can make covers pretty easily with a good glue or double-sided tape.

Last thing to note is that it’s important to take these window inserts out for at least an hour or two every day. It’s inevitable to build condensation behind them that can eventually lead to mold and other issues you don’t want to deal with. Remember, insulation doesn’t just help with the cold – good insulation helps to keep your van cooler in the summer, and window inserts can be a huge relief on hot days where the sun is baking your windows full force. They also make pretty fantastic blackout curtains for when you want to sleep in or just be stealthy.

2. GET A PORTABLE DIESEL HEATER
Space heaters are great but draw A TON of power. Unless you’re at an RV Park with a 50A hookup, chances are that your batteries will only sustain you for a little while or you’ll be constantly tripping breakers. Even with a massive battery bank, power from solar – especially in the winter with fewer hours of daylight – just doesn’t cut it to run a space heater.
Wood stoves are awesome but can require a lot of planning to find the best location and sacrifice that space in your van even when it’s warm outside. If we were in a skoolie then I think a wood stove could be pretty sweet for heat and cooking but it’s just not feasible for our current van. A propane heater is a good solution for the sake of portability and longevity. Propane creates a ton of moisture. A dry fuel source, like diesel, is a much better option (see update below). Like most cold weather rated RVs, our van has a propane furnace built in. We also use propane for the stove and fridge and have to fill up about once a month (35L tank). We are lucky in respect to not having to install an additional heating system but our furnace draws a fair amount of battery power and isn’t in the greatest location.

Portable propane heaters, like the Buddy Heaters, are a decent solution for people who don’t have a furnace and only experience cold temperatures for a couple months of the year. Just like outdoor stoves, they hook up to the small green propane canisters that you can get pretty much anywhere. You can also buy an attachment to hook it up to a regular 30L BBQ tank if you’ve got the space. Although they are rated as safe for indoor use, always have a carbon monoxide detector when running propane appliances.
It’s also important to note that propane creates moisture as it combusts, which isn’t great in a small space. While other options that run off of gasoline or diesel exist, propane is generally the most economical. *2019 UPDATE: Goodbye propane and hello diesel! With the rise of more affordable options for diesel heaters coming from China (that perform just as well as expensive European ones), a diesel heater is the way to go. Dry heat, efficient fuel consumption, and reasonable power draw make Chinese diesel heaters the best option for vans and RVs.

3. DIVIDE THE CAB FROM THE LIVING AREA
Some may have already done this for privacy, but adding a thick blackout curtain between your front driving area and your living area helps big time with keeping heat in and being stealthy. Even in newer vehicles, you’ve got some major heat loss points with the windshield and front doors. Creating a layer to separate this area helps to keep the heat from your heater where you need it. The blackout curtain also blocks light (hence the name) from the outside coming in and from the inside going out. When city camping on a residential street or even a Walmart parking lot, closing off your entire living area from your driving zone makes your van look like less of a home and more of a cargo van. Blackout curtains for van life are essential.

We used a thick black knit fabric for the side facing the driving area and doubled it up with a patterned fabric for our view from inside. We added screw-in snaps to the ceiling so we can easily attach and detach the curtain and store it folded. You could also put in a curtain rod or use hooks and sash wire if you’ve got the space to tuck the curtain away when you’re not using it.

4. COMBAT MOISTURE
If you, like most people, spend your whole day breathing, then you’re bound to build up a lot of condensation during times of cooler weather. Whenever you breathe and see your breath, that’s all the moisture you’re visibly releasing into the air. After a cold night’s sleep, chances are you’ll find your windows fogged up the next morning. Seeing as there’s nothing you can really do to stop this unless you find some magical way to never exhale, all you can do is find ways to help absorb the existing moisture in the air. This is especially problematic when using propane heat.

Your classic solution is a dehumidifier. Similar to a space heater, these are great in regular homes but aren’t as viable in vans because a good one will take up a lot of space and draw a lot of power. They do sell battery operated ones and 12V options but they don’t seem to perform as well as traditional units.
Unfortunately, the only route we’ve been able to take are dehumidifying beads that work like the silica gel packets you find in the box when you buy new shoes. The beads expand as they absorb moisture and need to be replaced once they’ve expanded fully and discharged all their juice. You’ll notice that liquid will start to collect in the bottom of the container just like a dehumidifier fills up with water. It’s not an instant fix but the beads are inexpensive and it doesn’t take any power or batteries to work.
Air flow is also another important factor in reducing condensation. Don’t think that you need to have your windows open when it’s -20, but a slight crack in the window really helps. This allows the moist air to escape and not build up on your windows or surfaces.
Side note: We’ve also heard great things about the Eva-Dry dehumidifiers but haven’t gotten a chance to try one for ourselves. Apparently activated charcoal or road salt are also moisture absorbing options that we also haven’t tried.
5. GET A HEATED BLANKET

Heated blankets just feel downright cozy. If you’re not in the coldest of places then along with proper insulation, a heated blanket could be your ticket. Obviously the hotter the blanket, the more power it will draw but there are plenty of options on Amazon for low voltage blankets or battery-operated heating pads that’ll help to give you that extra bit of warmth while you sleep or just hangout.
If you don’t want to go the heated blanket route, then be sure to buy the right fabrics for maximum toastiness. Wool is definitely the best bet because it has lots of air space between the fibres that circulate warm air close to your body. Plus, Pendleton blankets definitely don’t look too shabby either. Naturally, wool can be expensive so anything fuzzy or fluffy will also do a good job at trapping warm air – hence why down blankets work so well.
Stay away from synthetic materials like acrylic and polyester because they’re less durable and don’t insulate as well. Here’s a very simple comparison of natural vs synthetic fibres. If you’re into it, a really good sleeping bag could be your best friend but we’re more comfortable with blankets that aren’t so noisy. Additionally, packing some hot water bottles around your bed could make for an inexpensive “rechargeable” heated blanket.
6. WRAP YOUR PIPES
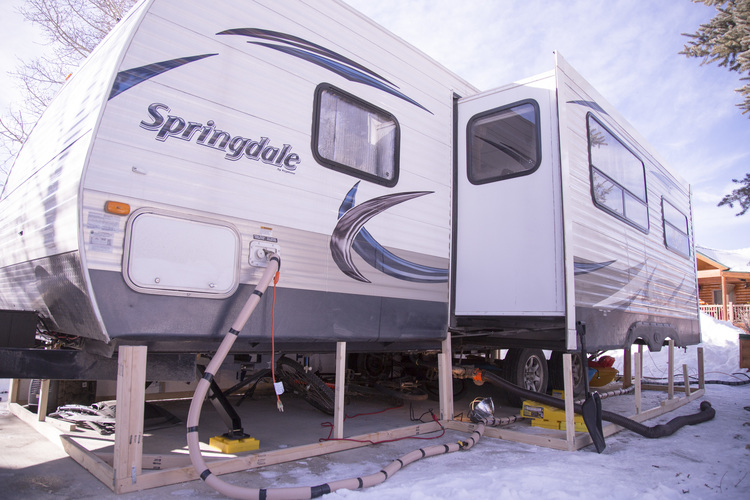
If all of your plumbing and water tanks are inside of your van, then it’s technically winterized. Assuming you’ll keep your living areas warm for sleeping and hanging out, your tanks and pipes should all be fine and not freeze. If like many RVs, your pipes are outside, you may need to wrap them to insulate and prevent freezing. If you have a steady supply of power, you can also string in a trace heating cable to really keep ’em toasty.
Full winterization would include draining all of your tanks and hot water heater and putting antifreeze in your lines and using fresh water from a jug…but that kind of sucks. If you’re stationary and have electricity in an RV park or campground, you might even opt for putting a small space heater next to your tanks to prevent them from freezing. Justin’s mom lives in a fifth wheel in Calgary, Alberta, where winters are usually below -30°C (-22°F) so they have a space heater under their kitchen sink and above their tanks. Not ideal but sometimes you gotta do what you gotta do.
7. SKIRTING

Skirting isn’t something that we personally do but if you’re stationary then this can help a ton. Whether you get custom skirting, use tarp-like material, or use insulation board, this helps to prevent cold air from travelling under your van or RV. This can help keep your floor a bit warmer and protect the underbelly of your rig – especially if your pipes and tanks are outdoors. Also, if you’re in an area that gets snow, this helps to keep snow away from under your vehicle.
VAN LIFE WINTERIZATION SHOPPING LIST
You can get pretty much everything you need to warm up your van on Amazon or at Home Depot:
Reflectix – 24″ x 50′ roll
Diesel Heater – 12V 5 kW
Blackout Curtain – You can buy pre-made thermal-lined curtains if you don’t want to make one yourself
DampRid Dehumidifier or Eva-Dry Dehumidifier
Low Voltage Heated Blanket – 50″ x 60″
Pendleton Wool Blanket – 64″ x 80″ (lots of different patterns but I particularly love this one)
Hot Water Bottles – 2L bottle with knit cover
Pipe Insulation – this one is 5/8″ thick but base the thickness on how cold it is where you live
Antifreeze – if you’re fully winterizing your pipes
Wishing everyone the coziest of winters and hoping these tips will help a few folks realize that winter van life is possible! Got your own insider tricks? Leave a comment below!
Check out Part II for our post-winter update. We reflect on which winter van life tips worked best and have added some new ones along the way.


