


So you wanna go off-grid but reading about installing a van solar system seems like gibberish? Check out our easy-to-understand guide for a concise video and detailed explanation with helpful tips and product links. We’ve also included a cost breakdown so you can start saving now!
If you’re working while living on the road, you know that electricity is essential to keep your devices charged. Even if you’re just enjoying a quiet weekend in the woods, it’s nice to be able to have access to power without having to run a noisy generator. The answer? Solar power. Putting a campervan solar system into play can seem intimidating and costly but at the end of the day, it’s a worthy one-time investment.
Take, for example, our routine when we first started out. Working long days Tuesday-Thursday meant that we had to pay for a campsite or RV Park in order to plug-in. Sure, you can camp out at coffee shops and other places with wifi, but that only really works when you’re around a city.
This meant that we were essentially paying over $100/week as our “power bill.” This got old real quick and defeated the purpose of us moving out of our apartment to get away from the bills in the first place. So we spent a while researching which components would work best for us and got the wheels turning on our van life solar system.
FULL DISCLOSURE: We are not electricians by any stretch. We had enough research and experience in our holsters to put an electrical system into place that works great and cuts our costs down immensely.

Solar Panels
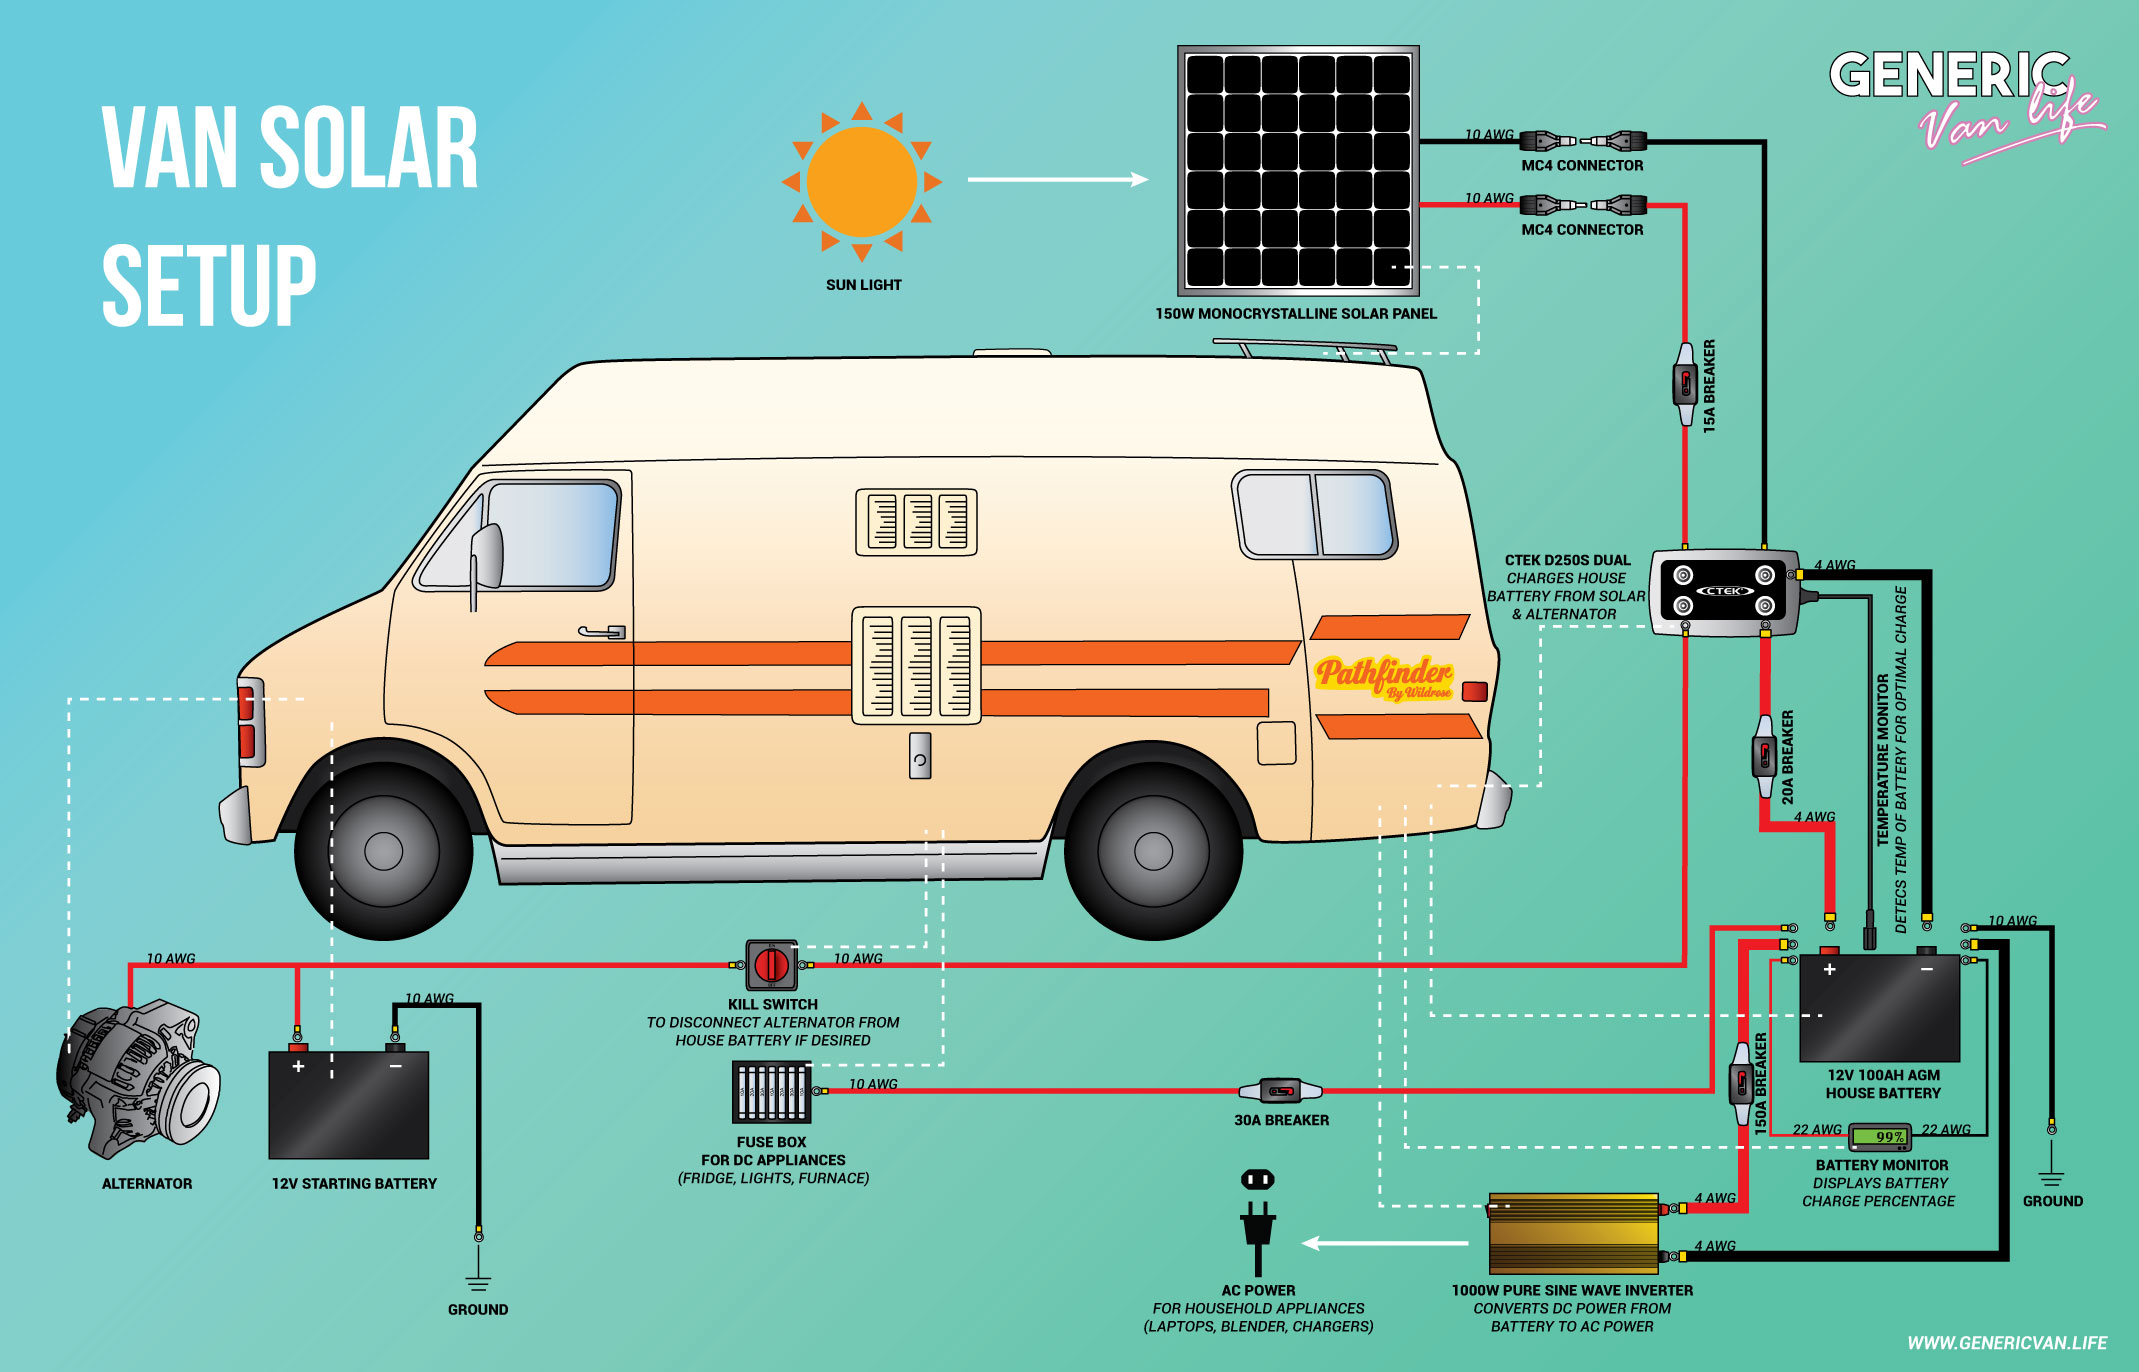
For our system, we are using a 150 watt monocrystalline solar panel from Renogy (**we added a second one later on so the wiring diagram shows the two solar panels. See updates below). In a nutshell, polycrystalline is cheaper but monocrystalline is more efficient.
We opted for this one mainly because it’s square so it fits nicely within our roof rack. The best solar panels are those that satisfy your power and space requirements. Also, rigid solar panels are generally more durable than flexible solar panels. We’d advise to only use a flexible solar panel if you absolutely need to. Learn more about the differences here.
We’re fairly light power users so 150 watts is sufficient for us, but take some time to pay attention to how much power you actually consume in a day. Take note of the wattage rating on your appliances too—you’d be surprised how much power some small appliances take. Use resources like Renogy’s calculator to help figure out how many solar panels you need. Getting the right solar panel array is a key component of your campervan solar system.

Wiring Solar Panels
Installing solar panels is a lot easier than you may think! The solar panel is hooked up using two MC4 connectors (wtf are those?! read this). These join the positive and the negative 10 AWG wires that come already attached to the solar panel to the positive and negative 10 AWG wires that feed inside.
Home Depot has a handy guide for understanding wire thickness, or read more in-depth about it here.
As mentioned, we already had a roof rack so we just ran two sturdy metal beams across and used z-brackets to secure it on. Depending on what your roof’s shaped like, you can easily mount the z-brackets directly onto the roof as well. We drilled two holes in the corner of the roof and sealed on a little cable hub, called an entry gland, to feed the wires through while keeping it water-tight.
On the positive wire, we’ve used a 15 amp breaker but you can also use a standard fuse. The breakers are a little more expensive upfront but never need to be replaced.


Charge Controller
The positive wire then attaches to our solar charge controller, which is a CTEK D250S Dual. This box is an MPPT charge controller that allows the battery to be charged by the solar panels and by the alternator while we’re driving—great on overcast days. CTEK is a Swedish company that makes some badass battery chargers for all kinds of different uses.
The negative wire is also attached to the negative terminal on the box. You can definitely opt for a much simpler and cheaper solar charge controller if you don’t plan to incorporate your alternator. That said, solar charge controllers are integral to a well-operating solar power system so be sure to still get something good quality.
Side note: When we bought the van, we already had a 12V lead acid marine battery in the back that had a wire running directly from the alternator that would charge while we were driving. We didn’t want to cut this power source off so that’s when we discovered the CTEK solar charge controller. You could also install a DC to DC charger.
Batteries
Next, a thicker 4 AWG positive wire runs from the CTEK charge controller to the positive battery terminal of the house battery. We’ve added a 20A breaker in between. A 4 AWG negative wire runs from the negative terminal of the CTEK charge controller to the negative battery terminal of the house battery.
We’re using the single 12V lead acid marine battery we already had but will eventually upgrade to two 6V batteries. When using multiple batteries, understand series and parallel wiring.
Your battery will probably be the most expensive component of your camper van solar setup so picking the right battery is essential. Determining how much battery capacity you need is based on how much power you’ll go through between full charges. To prolong the life of your batteries, you never want your battery bank to dip below 50%. So, it’s best to overestimate your solar energy needs to have extra power instead of scraping by.
The CTEK box is also equipped with a temperature sensor that sits on top of the battery to maintain an optimal charge.

Inverter
The house battery feeds a couple of different things. First, a separate positive and negative 4 AWG wire runs from the battery to the 1000w pure sine wave inverter, also from Renogy. This is probably the most important area to study before you buy. Understanding the amount of power that your household items use when they first start up versus when they’ve been on for a few minutes is key.
Take some time to understand surge power and sine waves to figure out how hefty of an inverter you’ll need. With a 150A breaker on the positive wire, the inverter converts the DC power coming off the battery into the AC power required for household appliances. You can plug stuff in directly to the inverter or run an extension cord, like we did. When shopping for inverters, read lots of customer reviews because the fan in many cheaper inverters can be incredibly noisy. It’s not an area you want to cheap out on.

Fuses
Next, a 10 AWG positive wire with a 30A breaker runs to our fuse box, where the fuses for all of our DC-powered appliances live. For us, that’s the fridge, lights, and furnace. Again, this was part of our existing rudimentary system when the alternator was hooked up directly to the house battery so that’s why the fuses are the old school glass ones. We recommend a fuse box like this as the hub of your electrical system.
Grounding
Also, there’s a negative 10 AWG wire running from the negative terminal of the house battery to an earthing point to ground the circuit. In our van, this is a big metal bolt that goes into the van’s body. Be sure to choose an unpainted area for grounding.
Alternator Tie-In
On the final mount of the CTEK charge controller, a positive 10 AWG wire runs all the way to the alternator and starting battery in the front. Here, we’ve put a killswitch in between if we ever want to cut the power from the alternator and rely solely on the solar panels. And of course, there is the existing negative 10 AWG wire grounding the starting battery as well.
Battery Monitor
Finally, the battery also has thin 22 AWG positive and negative wires running to a battery capacity monitor that allow us to see the charge percentage and how many volts it’s getting. Like we said above, you want to avoid letting your battery bank dip below 50% at all costs.

SO HOW MUCH DOES A VAN SOLAR SYSTEM COST?
Renogy 150W Monocrystalline Solar Panel* – we paid $200 *Boo, Renogy no longer makes this solar panel but this is basically the same one
Renogy 1000W Pure Sine Wave Inverter – we paid $180 BUT we bought ours refurbished directly from Renogy. A new one will set you back $270
CTEK D250S Dual (MPPT charge controller) – we paid $283
Battery – “free” because we already had one but expect to pay $300-500. This is the one we’re lusting over. **New battery update below
Wiring – we paid $70 (we bought the linked product from Amazon and got the rest bulk at Home Depot)
Breakers – we paid for 4 @ $13 each = $52. Using regular fuses would definitely cost less but always have a few extra on hand.
Killswitch – we paid $14
Metal beams for mounting + hardware – we paid $32 (you’ll have to go to the hardware store for these)
Mounting Z-Brackets – we paid $10
Rooftop Double Cable Entry Gland with Sealant – we paid $20
Battery Monitor – we paid $15
Cable Organization (wall mounts to keep the wiring tidy) – we paid $7
Grand total: $883
*Note that this pricing is all in US dollars because we purchased everything in the US of A.
FINAL THOUGHTS
We broke even in 6 weeks not having to pay for RV Parks. We now have so much more freedom to work from wherever we want to and not have to worry about reservations and fees thanks to solar energy!
Taking the time to thoroughly research which components fit your needs and budget is well worth it. Hopefully this helps anyone looking to add a solar system to your camper van or RV…it’s not as scary as it may seem!
Download our visual van solar system guide for a single solar panel here. Download the full-size version with two solar panels here.
Feel free to shoot us a message or leave a comment below if you have any further questions or need clarification on anything. This post is jam-packed with helpful links so click away!!
*DECEMBER 2018 UPDATE: NEW BATTERIES!
We finally bit the bullet and upgraded our battery bank! I wish we could say the whole thing still cost under $1000 but sadly, that is not true. Batteries ain’t cheap but they’re arguably the most important components to your solar setup (other than the solar panels, of course). After careful consideration, we opted for two 6V Trojan T-105 AGM batteries. Trojan batteries are the crème-de-la-crème and are a worthy investment if you depend on your battery bank as much as we do since we boondock 100% of the time. So why these particular ones?
Delaying our battery purchase allowed us plenty of time for research. We found that 6V batteries are said to discharge slightly slower than 12Vs. By having two 6V batteries connected in series, we’d have the correct voltage we need for our system (12V) while still maintaining the same capacity (217 AH).
Alternatively, we could have kept our existing set-up by opting for one single 12V battery or upgrading to two 12V batteries connected in parallel to double our capacity (i.e. 100 AH + 100 AH = 200 AH) while still maintaining the correct voltage.
Trojan’s Reliant line of AGM batteries are sealed and maintenance-free, meaning that we’re safe to keep them on their side without risking spillage as you would in a regular flooded battery. Finally, these AGM (Absorbed Glass Mat) batteries perform well in colder temperatures, unlike gel batteries which were our other option.
Here is a diagram of how our new battery bank is hooked up:

So far, we’re noticing a huge difference in battery life. With it being winter, this has been incredibly helpful in allowing us to run the furnace longer and use the lights since it sadly gets dark before 5PM. Even without much direct sunlight, our solar array is generating enough solar energy to stay in one spot for a couple of days.
If all this battery jargon is still a bit confusing, check out Trojan’s guide on where to get started when choosing the best battery for your needs. We bought our batteries at a battery store in Vancouver because we didn’t have an address to ship them to but they are available on Amazon as well.
So what’s our grand total at now?
We paid $884 CAD (including core charge + 12% BC tax) which is about $660 USD. This brings our grand total to $1543 USD. If you’re in America and can buy them on Amazon, it’ll set you back $476 for two, amounting to $1359 USD total.
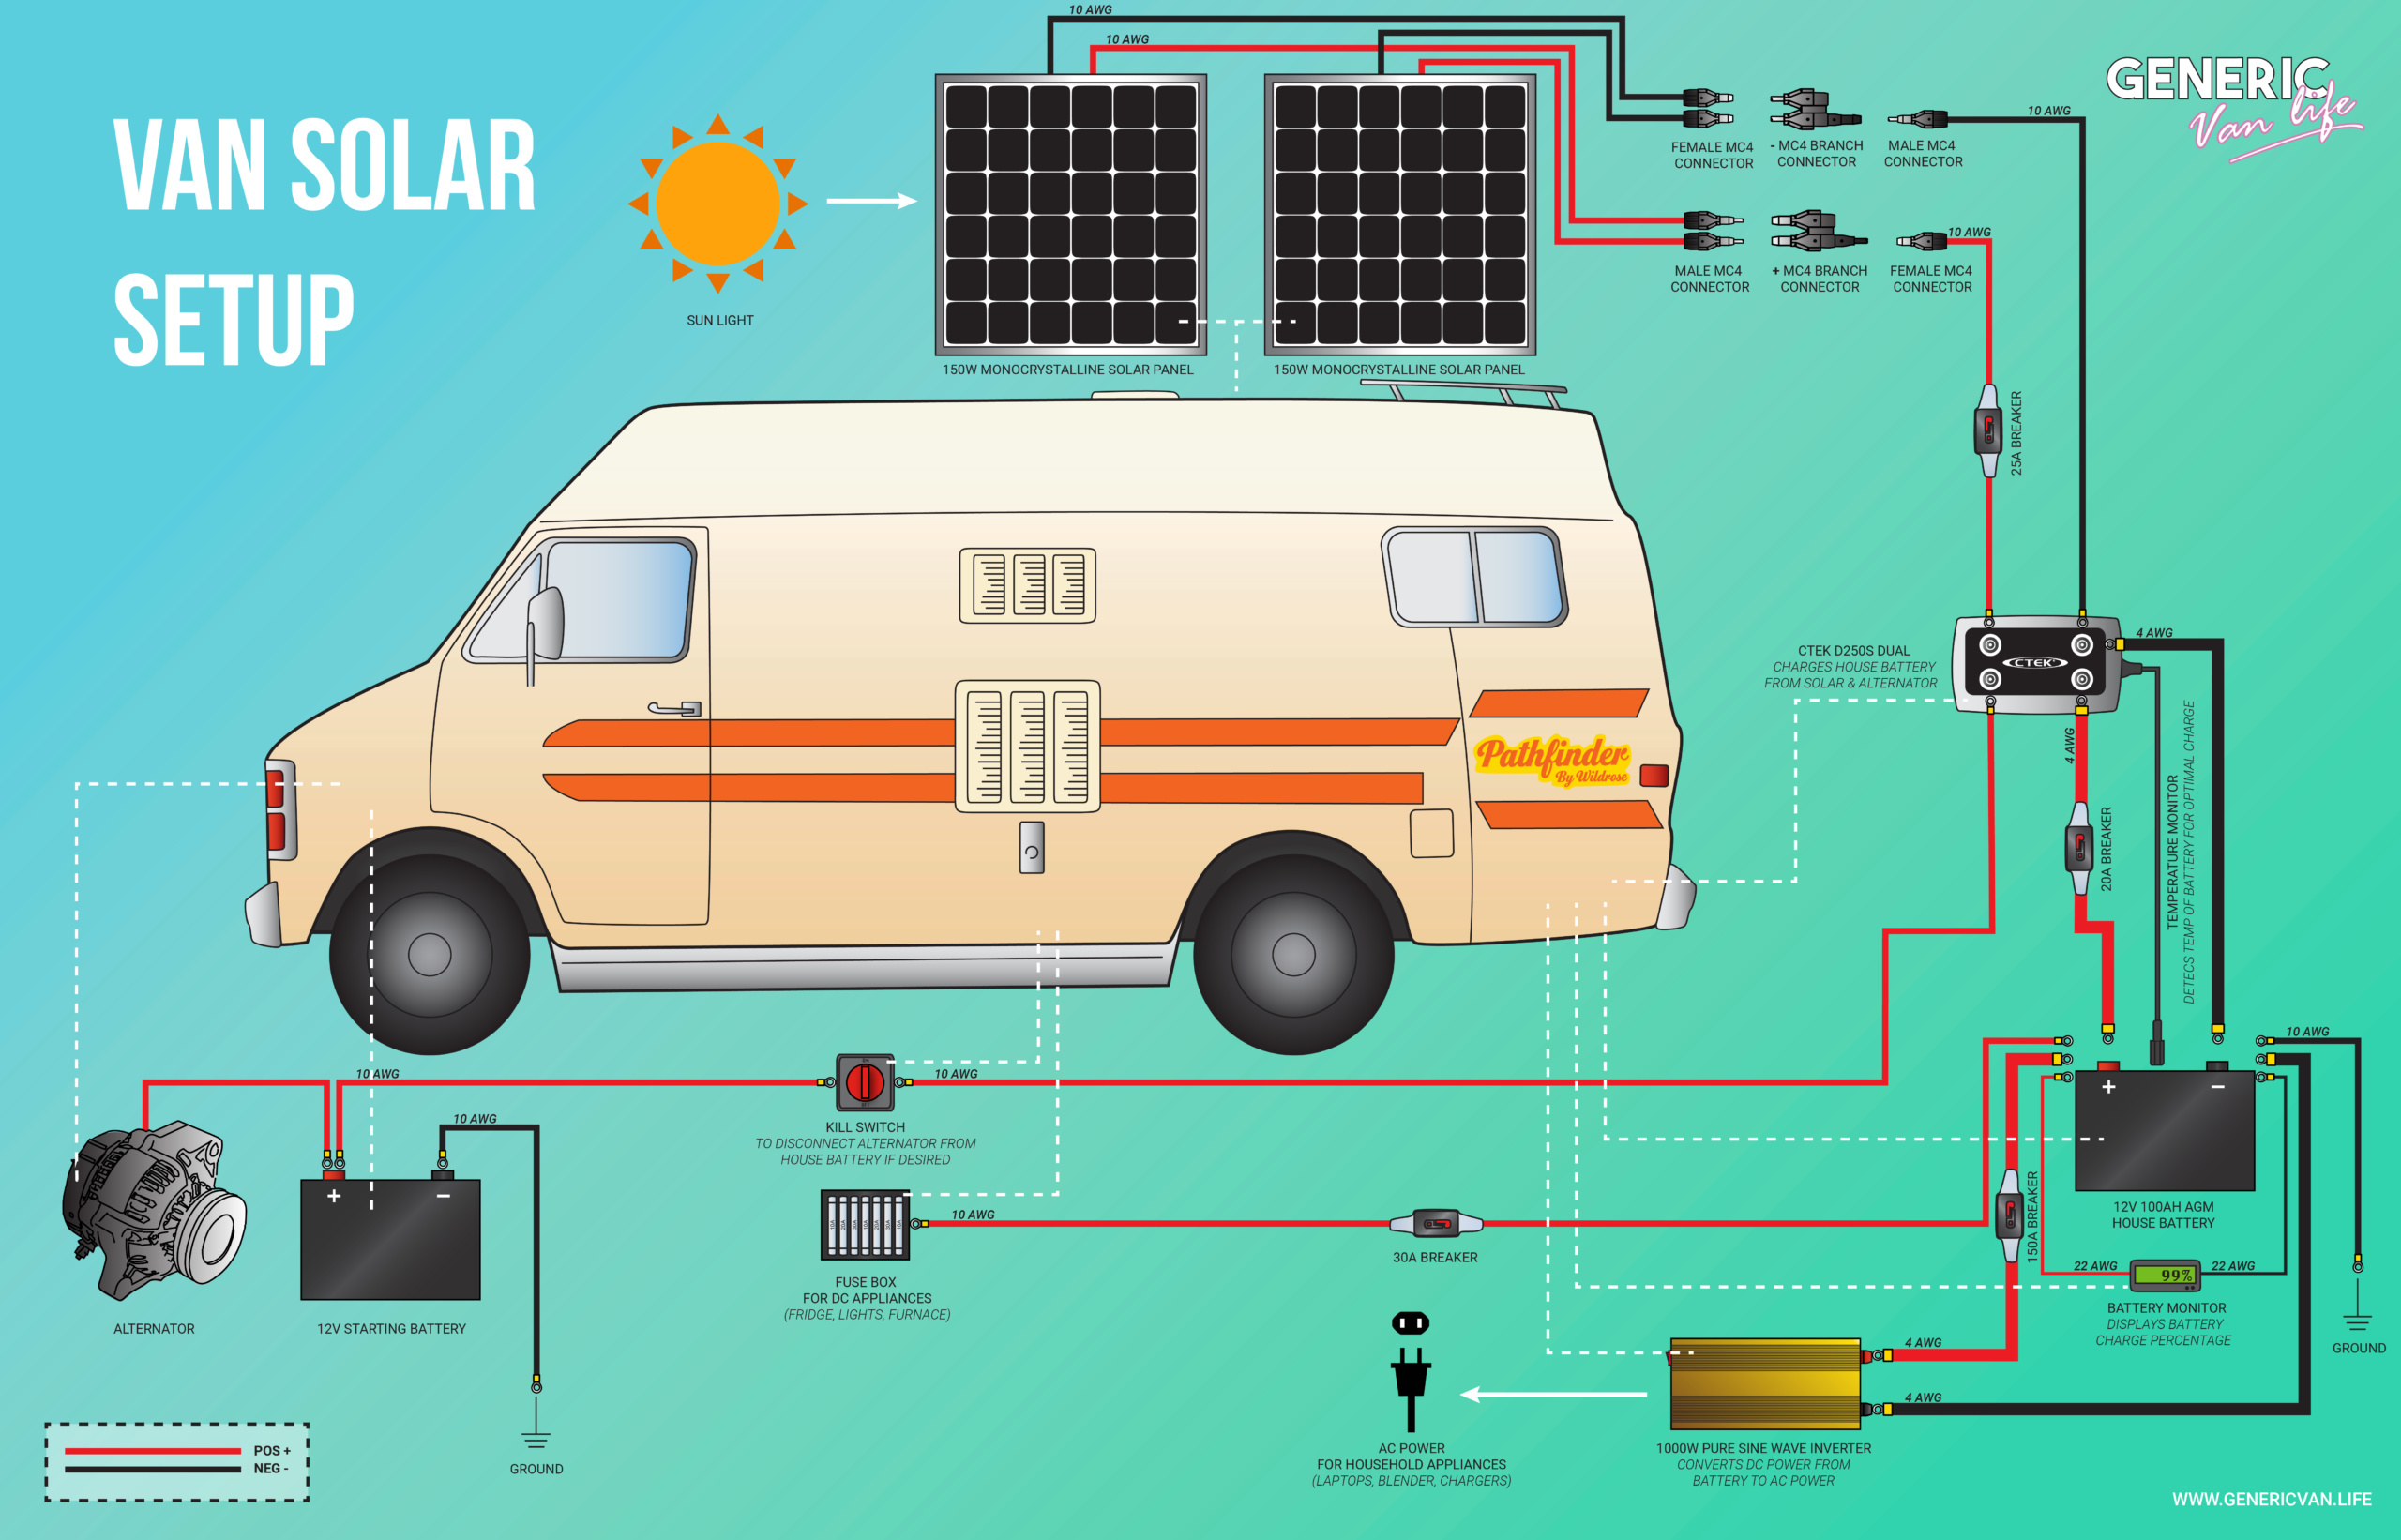
*JUNE 2019 UPDATE: ADDING A SECOND MONOCRYSTALLINE SOLAR PANEL FOR MORE SOLAR POWER!
After a very grey winter on Vancouver Island, we decided to add an additional 150w solar panel to the roof to maximize every bit of sun we get on overcast days. The wiring is super simple: the solar panels are connected in parallel, which gives us more amperage at the same voltage.
Once you have a second panel, all you need is a pair of MC4 branch connectors and some more 10 AWG solar wire with an MC4 connector on each end. You simply connect the positive wires from each solar panel into the female side of the positive branch connector and the negative wires from each solar panel into the male side of the negative branch connector. All of the van solar panels wires are now coming out of two central MC4 connectors.
Run the positive branch connector’s wire to the positive terminal of the battery and the negative branch connector’s wire to the negative terminal of the battery. That’s it!
Check out the wiring diagram below:

Unfortunately, Renogy doesn’t make their 150w panel anymore so we bought this Dokio panel from Amazon that ended up being virtually the same. We paid $144. The MC4 branch connectors were a whopping $7 and 10ft of MC4-clad solar wire set us back 20 bucks. With an additional set of mounting brackets at $9, this second solar panel addition cost us $180 USD.
This brings our grand total to $1,723 USD but it would only be $1,539 if we could have purchased the batteries in the States.


